(→Trivia) Tags: Visual edit apiedit |
ねずお (Message Wall | contribs) |
||
| (47 intermediate revisions by 29 users not shown) | |||
| Line 4: | Line 4: | ||
| imagesize = 300px |
| imagesize = 300px |
||
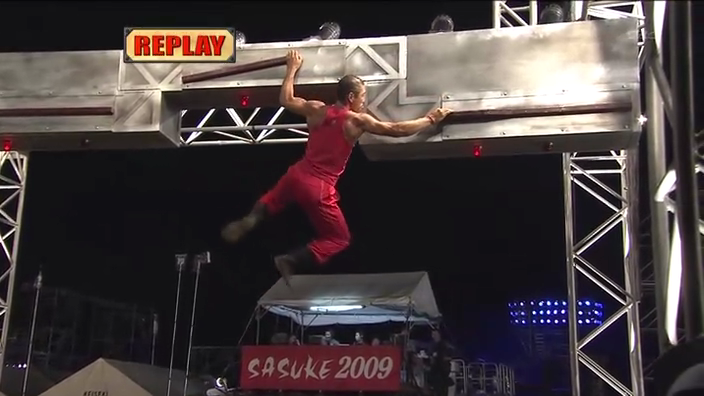
| caption = ''Takahashi'', [[SASUKE 19]] |
| caption = ''Takahashi'', [[SASUKE 19]] |
||
| − | | age = |
+ | | age =43 |
| home = Saitama Prefecture, Japan |
| home = Saitama Prefecture, Japan |
||
| job = Delivery Company Owner |
| job = Delivery Company Owner |
||
| height = 178 cm |
| height = 178 cm |
||
| weight = 68 kg |
| weight = 68 kg |
||
| − | | s_nickname = ''Kong |
+ | | s_nickname = ''Kong Express'' |
| − | | s_comps = [[List of SASUKE competitions| |
+ | | s_comps = [[List of SASUKE competitions|21 Competitions]] |
| s_first = [[SASUKE 5]] |
| s_first = [[SASUKE 5]] |
||
| − | | s_last = [[SASUKE |
+ | | s_last = [[SASUKE 35]] |
| s_best = [[SASUKE 24]], [[Final Stage]], [[G-Rope]] |
| s_best = [[SASUKE 24]], [[Final Stage]], [[G-Rope]] |
||
| s_song = |
| s_song = |
||
| − | | website =[https://www.facebook.com/kongsasuke Fcebook}<br>[https://twitter.com/kongsasuke Twitter] |
+ | | website =[https://www.facebook.com/kongsasuke Fcebook}<br />[https://twitter.com/kongsasuke Twitter] |
| − | | footnotes = |birth_date = March 25, 1976 |
+ | | footnotes = |birth_date = March 25, 1976}} |
| − | '''Takahashi Kenji''' (高橋 賢次) owns a one-man delivery company, ''Kong Express''. Because of this, he is sometimes called ''Kong Takahashi.'' He is regarded as one of ''SASUKE's'' most powerful competitors. In his |
+ | '''Takahashi Kenji''' (高橋 賢次) owns a one-man delivery company, ''Kong Express''. Because of this, he is sometimes called ''Kong Takahashi.'' He is regarded as one of ''SASUKE's'' most powerful competitors. In his 21 attempts, he has cleared the First Stage 10 times, Second Stage 8 times and the Third Stage once. He also holds the record for the most Second Stage clears/Third Stage attempts for a non-all star, only surprassed by the three all-stars [[Nagano Makoto]] (11 times), [[Yamamoto Shingo]] (11 times) and [[Takeda Toshihiro]] (13 times), with all of these competitors having competed in several more competitions (Nagano competed in 26 competitions, Takeda competed in 30 competitions, Yamamoto competed in 36). |
==The Early Days== |
==The Early Days== |
||
| Line 26: | Line 26: | ||
==Return Engagement== |
==Return Engagement== |
||
| − | After his long break, he returned in ''[[SASUKE 16]]''. He blazed through all the obstacles until he was once again fell short at the Cliffhanger |
+ | After his long break, he returned in ''[[SASUKE 16]]''. He blazed through all the obstacles until he was once again fell short at the Cliffhanger. |
| + | |||
| + | He would return in ''[[SASUKE 18]]'' where he was one of only six to defeat the redesigned First Stage and one of three to defeat the all-new Second Stage. But yet again, he failed the Shin-Cliffhanger when he could not complete the jump to the third ledge. |
||
After these three failures, Takahashi suffered a series of First Stage setbacks. In ''[[SASUKE 19]]'', he was one of many to fail the [[Jumping Spider]]. He defeated it in ''[[SASUKE 20]]'' but eventually failed the [[Flying Chute]]. In ''[[SASUKE 21]]'', he failed the Jumping Spider yet again, and in ''[[SASUKE 22]]'', he finally made it all the way to the [[Rope Ladder]] before timing out but was cut from the broadcast. |
After these three failures, Takahashi suffered a series of First Stage setbacks. In ''[[SASUKE 19]]'', he was one of many to fail the [[Jumping Spider]]. He defeated it in ''[[SASUKE 20]]'' but eventually failed the [[Flying Chute]]. In ''[[SASUKE 21]]'', he failed the Jumping Spider yet again, and in ''[[SASUKE 22]]'', he finally made it all the way to the [[Rope Ladder]] before timing out but was cut from the broadcast. |
||
==''SASUKE'' Rebirth== |
==''SASUKE'' Rebirth== |
||
| − | + | In ''[[SASUKE 23]]'', he went at a much faster pace and completed the First Stage with time to spare. In the Second Stage, he was the first to defeat the new [[Unstable Bridge]] and as a result he was the first to clear [[Stage Two]]. In the Third Stage, he reached the Shin-Cliffhanger, but attacked it with a different strategy. He used his long [[File:Vlcsnap-10678096.png|thumb|320px|Takahashi Kenji reaching over the gap of the Shin-Cliffhanger (SASUKE 23). He is the only person to ever successfully do so.]]armspan to grab the third ledge rather than jump to it. He is the only competitor to complete the Shin-Cliffhanger without jumping. This unorthodox strategy, which some refer to as the ''Kong Cross'', allowed him to easily complete the obstacle. This was also the first time he ever cleared any version of the [[Cliffhanger]] After clearing three obstacles that were new to him, he fell just short of the finish mat on the final obstacle, the [[Gliding Ring]]. |
|
| − | In ''[[SASUKE 24]]'', Takahashi again performed exceptionally. He cleared the First Stage with 24.06 seconds remaining, and on the Second Stage he swiftly defeated the new Salmon Ladder and Unstable Bridge combination, and easily defeating the stage with 32.11 seconds remaining, the fastest time in that tournament by far. In the Third Stage, he focused his energy and beat the Gliding Ring that he failed in the previous tournament and beat Stage Three for the first time ever. In the [[Final Stage]], he scaled the Heavenly Ladder rather quickly, but on the G-Rope his safety rigging tangled up and he timed out about halfway up the rope. |
+ | In ''[[SASUKE 24]]'', Takahashi again performed exceptionally. He cleared the First Stage with 24.06 seconds remaining, and on the Second Stage he swiftly defeated the new Salmon Ladder and Unstable Bridge combination, and easily defeating the stage with 32.11 seconds remaining, the fastest time in that tournament by far,also the 2nd fastest in sasuke history before levi's 38.54 seconds in sasuke 20.In the Third Stage, he focused his energy and beat the Gliding Ring that he failed in the previous tournament and beat Stage Three for the first time ever. In the [[Final Stage]], he scaled the Heavenly Ladder rather quickly, but on the G-Rope his safety rigging tangled up and he timed out about halfway up the rope. |
In ''[[SASUKE 25]]'', Takahashi received a low [[start position]] in the lottery, #40. During the tournament, he beat the First Stage and Second Stage again. In the Third Stage, he was the first to attempt and beat the new [[Roulette Cylinder]], [[Doorknob Grasper]] and [[Floating Boards]]. He eventually failed the [[Ultimate Cliffhanger]] while attempting the transition from the first ledge to the second ledge. |
In ''[[SASUKE 25]]'', Takahashi received a low [[start position]] in the lottery, #40. During the tournament, he beat the First Stage and Second Stage again. In the Third Stage, he was the first to attempt and beat the new [[Roulette Cylinder]], [[Doorknob Grasper]] and [[Floating Boards]]. He eventually failed the [[Ultimate Cliffhanger]] while attempting the transition from the first ledge to the second ledge. |
||
| − | In ''[[SASUKE 26]]'', he shocked many when he slipped off the [[Rolling Escargot]] that had claimed many strong competitors including [[Yamamoto Shingo|one]] All-Star and [[Kanno Hitoshi|one]] Shin Sedai. |
+ | In ''[[SASUKE 26]]'', he shocked many when he slipped off the [[Rolling Escargot]] that had claimed many strong competitors including [[Yamamoto Shingo|one]] All-Star and [[Kanno Hitoshi|one]] Shin Sedai. His run was digested along with [[Kanno Hitoshi|Kanno Hitoshi's]] failure of the same obstacle (although G4 aired both of their runs in full). |
| − | In ''[[SASUKE 27]]'', he again was digested in the First Stage due to the numerous clears, this time failing the new [[Spin Bridge]] obstacle. He also received his lowest known start position in |
+ | In ''[[SASUKE 27]]'', he again was digested in the First Stage due to the numerous clears, this time failing the new [[Spin Bridge]] obstacle. He also received his lowest known start position in any competition, #15. |
| − | Although present in [[SASUKE 28]], he did not compete for unknown reasons. In [[SASUKE 29]] he managed to clear the First Stage for the first time since the 25th tournament, doing so with 23 seconds remaining. He then became only the second man to clear the Second Stage, doing so with 5.14 seconds remaining, the fastest time of the |
+ | Although present in [[SASUKE 28]], he did not compete for unknown reasons. In [[SASUKE 29]] he managed to clear the First Stage for the first time since the 25th tournament, doing so with 23 seconds remaining. He then became only the second man to clear the Second Stage, doing so with 5.14 seconds remaining, the fastest time of the night. On the Third Stage, he started off well, showing unbelivable speed and power on the [[Iron Paddler]] by speeding through the obstacle in just 3 seconds. However, he failed the transition to the 2nd ledge in [[Crazy Cliffhanger]] due to overreaching, as his left hand was far from the end of the first ledge. |
| + | [[File:Kenji 29 1.jpeg |thumb|300px|right]] |
||
| + | [[File:Kenji 29 2.jpeg |thumb|300px|right]] |
||
| + | [[File:Kenji 29 3.jpeg |thumb|300px|Kenji failing the [[Crazy Cliffhanger]] in [[SASUKE 29]]]] |
||
| + | [[SASUKE 30]], he cleared the First Stage with ease, but on the Second Stage, he was disqualified on the [[Swap Salmon Ladder]] in a rather controversial matter. Although he landed the bar properly on the second jump, the left landing ledge pulls back causing the left side of the bar to drop down to the landing ledge and then pops back in after the left bar drops. Takahashi was greatly angered with this circumstance and even complained about it. Unfortunately it fell on deaf ears and his 100% Second Stage clear record was ruined. |
||
In [[SASUKE 31]], Takahashi made it back to the [[Third Stage]], but failed at the [[Crazy Cliffhanger]] for a 2nd time. This time he made it to the jump, but couldn't hang on to the 4th ledge. |
In [[SASUKE 31]], Takahashi made it back to the [[Third Stage]], but failed at the [[Crazy Cliffhanger]] for a 2nd time. This time he made it to the jump, but couldn't hang on to the 4th ledge. |
||
| + | Takahashi then competed in [[American Ninja Warrior: USA vs the World (2016)]], as part of the reformed Team Japan which was modified to include taller competitors (such as himself and [[Kawaguchi Tomohiro]]) to adapt to the height-biased American course. Takahashi competed in Stage 1, up against [[Tim Champion]] and [[Kevin Bull]]. He went second, after Champion had failed the final obstacle, the [[Triple Swing]], however he failed earlier on the second obstacle, the [[Propeller Untei]] and so Team Japan lost that round. He then went up against [[Drew Drechsel]] and [[Sean McColl]] in Stage 2. Drechsel had gone first and set a time of 1:23 seconds. Takahashi clearly rushed the Double Salmon Ladder as he attempted to clear 2 rungs at a time. He landed lob-sided in doing this and eventually the bar fell off the ladder, plummeting Takahashi into the water, costing Japan a win. |
||
| − | {{clear}} |
||
| + | |||
| + | In [[SASUKE 32]] he failed the [[TIE Fighter]], a new obstacle. The last few runs were postponed after [[Drew Drechsel]]'s run, who went directly after Takahashi. Drechsel had complained that the course was too wet towards the end of the day when he ran, implying that Takahashi's run, and resultantly the obstacle that he fell on was wet and slippery. |
||
| + | |||
| + | In [[SASUKE 33]], he failed on the [[TIE Fighter]] again. His run was digested. |
||
| + | |||
| + | In [[SASUKE 34]], Takahashi got his revenge on the [[TIE Fighter]] and managed to clear the First Stage. In the Second Stage, his run ended on the [[Reverse Conveyor]], where he struggled and eventually fell off the belt due to fatigue, marking the first time that he legitimately failed the Second Stage. |
||
| + | |||
| + | In [[SASUKE 35]], he made it to the [[Dragon Glider]], however, the bar became dislodged, and his feet touched the water. In a fluff piece and post run interview, Takahashi said that Sasuke 35 would be his last run. |
||
== Trivia == |
== Trivia == |
||
* Takahashi has attempted the most versions of the [[Cliffhanger]] with 5. |
* Takahashi has attempted the most versions of the [[Cliffhanger]] with 5. |
||
| − | * Takahashi, |
+ | * Takahashi, [[Urushihara Yuuji]] and [[Kanno Hitoshi]] are the only competitors to have cleared all four versions of the [[Salmon Ladder]]. |
| + | * Takahashi is the first competitor to fail the [[Reverse Conveyor]] by not timing out. |
||
==Results== |
==Results== |
||
| Line 59: | Line 74: | ||
|- |
|- |
||
| style="background-color: #721410;" align="center" |[[SASUKE 5|5]] |
| style="background-color: #721410;" align="center" |[[SASUKE 5|5]] |
||
| − | | style="background-color: #721410;" align="center" | |
+ | | style="background-color: #721410;" align="center" |76 |
| − | | style="background-color: #721410;" align="center" |Failed Rolling Maruta (First Stage) |
+ | | style="background-color: #721410;" align="center" |Failed [[Rolling Maruta]] (First Stage) |
| style="background-color: #721410;" align="center" |All Cut. External Information. |
| style="background-color: #721410;" align="center" |All Cut. External Information. |
||
|- |
|- |
||
| style="background-color: #530B09;" align="center" |[[SASUKE 6|6]] |
| style="background-color: #530B09;" align="center" |[[SASUKE 6|6]] |
||
| − | | style="background-color: #530B09;" align="center" | |
+ | | style="background-color: #530B09;" align="center" |67 |
| − | | style="background-color: #530B09;" align="center" |Failed Soritatsu Kabe (First Stage) |
+ | | style="background-color: #530B09;" align="center" |Failed [[Soritatsu Kabe]] (First Stage) |
| style="background-color: #530B09;" align="center" |All Cut. Time Out. External Information. |
| style="background-color: #530B09;" align="center" |All Cut. Time Out. External Information. |
||
|- |
|- |
||
| style="background-color: #721410;" align="center" |[[SASUKE 7|7]] |
| style="background-color: #721410;" align="center" |[[SASUKE 7|7]] |
||
| style="background-color: #721410;" align="center" |46 |
| style="background-color: #721410;" align="center" |46 |
||
| − | | style="background-color: #721410;" align="center" |Failed Cliff Hanger (Third Stage) |
+ | | style="background-color: #721410;" align="center" |Failed [[Cliff Hanger|Cliffhanger]] (Third Stage) |
| − | | style="background-color: #721410;" align="center" |Touched down the mat with one foot, but lost his balance and fell back into the water. |
+ | | style="background-color: #721410;" align="center" |Touched down the mat with one foot, but lost his balance and fell back into the water. 2nd and 3rd stage run digested on g4. |
|- |
|- |
||
| style="background-color: #530B09;" align="center" |[[SASUKE 16|16]] |
| style="background-color: #530B09;" align="center" |[[SASUKE 16|16]] |
||
| style="background-color: #530B09;" align="center" |66 |
| style="background-color: #530B09;" align="center" |66 |
||
| − | | style="background-color: #530B09;" align="center" |Failed |
+ | | style="background-color: #530B09;" align="center" |Failed [[Cliffhanger]] (Third Stage) |
| style="background-color: #530B09;" align="center" |Failed Transition. |
| style="background-color: #530B09;" align="center" |Failed Transition. |
||
|- |
|- |
||
| style="background-color: #721410;" align="center" |[[SASUKE 18|18]] |
| style="background-color: #721410;" align="center" |[[SASUKE 18|18]] |
||
| style="background-color: #721410;" align="center" |98 |
| style="background-color: #721410;" align="center" |98 |
||
| − | | style="background-color: #721410;" align="center" |Failed Shin- |
+ | | style="background-color: #721410;" align="center" |Failed [[Shin-Cliffhanger]] (Third Stage) |
| style="background-color: #721410;" align="center" |Last Man Standing. |
| style="background-color: #721410;" align="center" |Last Man Standing. |
||
|- |
|- |
||
| style="background-color: #530B09;" align="center" |[[SASUKE 19|19]] |
| style="background-color: #530B09;" align="center" |[[SASUKE 19|19]] |
||
| style="background-color: #530B09;" align="center" |84 |
| style="background-color: #530B09;" align="center" |84 |
||
| − | | style="background-color: #530B09;" align="center" |Failed Jumping Spider (First Stage) |
+ | | style="background-color: #530B09;" align="center" |Failed [[Jumping Spider]] (First Stage) |
| style="background-color: #530B09;" align="center" | |
| style="background-color: #530B09;" align="center" | |
||
|- |
|- |
||
| style="background-color: #721410;" align="center" |[[SASUKE 20|20]] |
| style="background-color: #721410;" align="center" |[[SASUKE 20|20]] |
||
| style="background-color: #721410;" align="center" |1988 |
| style="background-color: #721410;" align="center" |1988 |
||
| − | | style="background-color: #721410;" align="center" |Failed Flying Chute (First Stage) |
+ | | style="background-color: #721410;" align="center" |Failed [[Flying Chute]] (First Stage) |
| style="background-color: #721410;" align="center" | |
| style="background-color: #721410;" align="center" | |
||
|- |
|- |
||
| style="background-color: #530B09;" align="center" |[[SASUKE 21|21]] |
| style="background-color: #530B09;" align="center" |[[SASUKE 21|21]] |
||
| style="background-color: #530B09;" align="center" |85 |
| style="background-color: #530B09;" align="center" |85 |
||
| − | | style="background-color: #530B09;" align="center" |Failed Jumping Spider (First Stage) |
+ | | style="background-color: #530B09;" align="center" |Failed [[Jumping Spider]] (First Stage) |
| style="background-color: #530B09;" align="center" |Digest. |
| style="background-color: #530B09;" align="center" |Digest. |
||
|- |
|- |
||
| style="background-color: #721410;" align="center" |[[SASUKE 22|22]] |
| style="background-color: #721410;" align="center" |[[SASUKE 22|22]] |
||
| style="background-color: #721410;" align="center" |80 |
| style="background-color: #721410;" align="center" |80 |
||
| − | | style="background-color: #721410;" align="center" |Failed Rope Ladder (First Stage) |
+ | | style="background-color: #721410;" align="center" |Failed [[Rope Ladder]] (First Stage) |
| style="background-color: #721410;" align="center" |All Cut. Time Out. |
| style="background-color: #721410;" align="center" |All Cut. Time Out. |
||
|- |
|- |
||
| style="background-color: #530B09;" align="center" |[[SASUKE 23|23]] |
| style="background-color: #530B09;" align="center" |[[SASUKE 23|23]] |
||
| style="background-color: #530B09;" align="center" |84 |
| style="background-color: #530B09;" align="center" |84 |
||
| − | | style="background-color: #530B09;" align="center" |Failed Gliding Ring (Third Stage) |
+ | | style="background-color: #530B09;" align="center" |Failed [[Gliding Ring]] (Third Stage) |
| style="background-color: #530B09;" align="center" |Failed Jump. |
| style="background-color: #530B09;" align="center" |Failed Jump. |
||
|- |
|- |
||
| style="background-color: #721410;" align="center" |[[SASUKE 24|24]] |
| style="background-color: #721410;" align="center" |[[SASUKE 24|24]] |
||
| style="background-color: #721410;" align="center" |94 |
| style="background-color: #721410;" align="center" |94 |
||
| − | | style="background-color: #721410;" align="center" |Failed G-Rope (Final Stage) |
+ | | style="background-color: #721410;" align="center" |Failed [[G-Rope]] (Final Stage) |
| style="background-color: #721410;" align="center" |20m up. Twisted up the G-Rope and got the safety wire tangled, causing him to stop. |
| style="background-color: #721410;" align="center" |20m up. Twisted up the G-Rope and got the safety wire tangled, causing him to stop. |
||
|- |
|- |
||
| style="background-color: #530B09;" align="center" |[[SASUKE 25|25]] |
| style="background-color: #530B09;" align="center" |[[SASUKE 25|25]] |
||
| style="background-color: #530B09;" align="center" |40 |
| style="background-color: #530B09;" align="center" |40 |
||
| − | | style="background-color: #530B09;" align="center" |Failed Ultimate |
+ | | style="background-color: #530B09;" align="center" |Failed [[Ultimate Cliffhanger]] (Third Stage) |
| style="background-color: #530B09;" align="center" |First Ledge. |
| style="background-color: #530B09;" align="center" |First Ledge. |
||
|- |
|- |
||
| style="background-color: #721410;" align="center" |[[SASUKE 26|26]] |
| style="background-color: #721410;" align="center" |[[SASUKE 26|26]] |
||
| style="background-color: #721410;" align="center" |96 |
| style="background-color: #721410;" align="center" |96 |
||
| − | | style="background-color: #721410;" align="center" |Failed Rolling Escargot (First Stage) |
+ | | style="background-color: #721410;" align="center" |Failed [[Rolling Escargot]] (First Stage) |
| style="background-color: #721410;" align="center" |Digest. Full run shown on G4. |
| style="background-color: #721410;" align="center" |Digest. Full run shown on G4. |
||
|- |
|- |
||
| style="background-color: #530B09;" align="center" |[[SASUKE 27|27]] |
| style="background-color: #530B09;" align="center" |[[SASUKE 27|27]] |
||
| style="background-color: #530B09;" align="center" |15 |
| style="background-color: #530B09;" align="center" |15 |
||
| − | | style="background-color: #530B09;" align="center" |Failed Spin Bridge (First Stage) |
+ | | style="background-color: #530B09;" align="center" |Failed [[Spin Bridge]] (First Stage) |
| style="background-color: #530B09;" align="center" |Digest. Full run shown on G4. |
| style="background-color: #530B09;" align="center" |Digest. Full run shown on G4. |
||
|- |
|- |
||
| style="background-color: #721410;" align="center" |[[SASUKE 29|29]] |
| style="background-color: #721410;" align="center" |[[SASUKE 29|29]] |
||
| style="background-color: #721410;" align="center" |87 |
| style="background-color: #721410;" align="center" |87 |
||
| − | | style="background-color: #721410;" align="center" |Failed Crazy Cliffhanger (Third Stage) |
+ | | style="background-color: #721410;" align="center" |Failed [[Crazy Cliffhanger]] (Third Stage) |
| style="background-color: #721410;" align="center" |Failed Transition to 2nd Ledge. |
| style="background-color: #721410;" align="center" |Failed Transition to 2nd Ledge. |
||
|- |
|- |
||
| style="background-color: #530B09;" align="center" |[[SASUKE 30|30]] |
| style="background-color: #530B09;" align="center" |[[SASUKE 30|30]] |
||
| style="background-color: #530B09;" align="center" |2995 |
| style="background-color: #530B09;" align="center" |2995 |
||
| − | | style="background-color: #530B09;" align="center" |Failed Swap Salmon Ladder (Second Stage) |
+ | | style="background-color: #530B09;" align="center" |Failed [[Swap Salmon Ladder]] (Second Stage) |
| style="background-color: #530B09;" align="center" |Disqualified. Technical error. First time failing the 2nd Stage. |
| style="background-color: #530B09;" align="center" |Disqualified. Technical error. First time failing the 2nd Stage. |
||
|- |
|- |
||
| − | |[[SASUKE 31|31]] |
+ | | style="background-color: #721410;" align="center" |[[SASUKE 31|31]] |
| + | | style="background-color: #721410;" align="center" |89 |
||
| − | |89 |
||
| − | |Failed Crazy Cliffhanger (Third Stage) |
+ | | style="background-color: #721410;" align="center" |Failed [[Crazy Cliffhanger]] (Third Stage) |
| − | |Failed Jump to 4th Ledge. |
+ | | style="background-color: #721410;" align="center" |Failed Jump to 4th Ledge. |
| + | |- |
||
| + | |[http://sasukepedia.wikia.com/wiki/SASUKE_32 32] |
||
| + | |92 |
||
| + | |Failed [[TIE Fighter]] (First Stage) |
||
| + | | |
||
| + | |- |
||
| + | | style="background-color: #721410;" align="center" |[[SASUKE 33|33]] |
||
| + | | style="background-color: #721410;" align="center" |87 |
||
| + | | style="background-color: #721410;" align="center" |Failed [[TIE Fighter]] (First Stage) |
||
| + | | style="background-color: #721410;" align="center" |Digest. |
||
| + | |- |
||
| + | |[[SASUKE 34|34]] |
||
| + | |83 |
||
| + | |Failed [[Reverse Conveyor]] (Second Stage) |
||
| + | |Digest. Fell off the belt. |
||
| + | |- |
||
| + | | style="background-color: #721410;" align="center" |[[SASUKE 35|35]] |
||
| + | | style="background-color: #721410;" align="center" |93 |
||
| + | | style="background-color: #721410;" align="center" |Failed [[Dragon Glider]] (First Stage) |
||
| + | | style="background-color: #721410;" align="center" |Course Out. Dislodged bar and his feet touched the water. |
||
|} |
|} |
||
| + | [[Category:Retired competitors]] |
||
| + | [[Category:SASUKE competitors]] |
||
| + | [[Category:USA vs. The World]] |
||
Revision as of 07:09, 1 November 2019
Takahashi Kenji (高橋 賢次) owns a one-man delivery company, Kong Express. Because of this, he is sometimes called Kong Takahashi. He is regarded as one of SASUKE's most powerful competitors. In his 21 attempts, he has cleared the First Stage 10 times, Second Stage 8 times and the Third Stage once. He also holds the record for the most Second Stage clears/Third Stage attempts for a non-all star, only surprassed by the three all-stars Nagano Makoto (11 times), Yamamoto Shingo (11 times) and Takeda Toshihiro (13 times), with all of these competitors having competed in several more competitions (Nagano competed in 26 competitions, Takeda competed in 30 competitions, Yamamoto competed in 36).
The Early Days
According to information from Kenji himself, he first took part in SASUKE 5, where he was cut from broadcast. There, he failed the Rolling Maruta. He was also cut from SASUKE 6 where he timed out on the Soritatsu Kabe.
His first broadcast attempt was SASUKE 7, his third appearance. There, he was one of eight to complete the First Stage that day and advanced all the way to the Third Stage's Cliffhanger where he was undone by the third ledge. He then took an eight-competition hiatus.
Return Engagement
After his long break, he returned in SASUKE 16. He blazed through all the obstacles until he was once again fell short at the Cliffhanger.
He would return in SASUKE 18 where he was one of only six to defeat the redesigned First Stage and one of three to defeat the all-new Second Stage. But yet again, he failed the Shin-Cliffhanger when he could not complete the jump to the third ledge.
After these three failures, Takahashi suffered a series of First Stage setbacks. In SASUKE 19, he was one of many to fail the Jumping Spider. He defeated it in SASUKE 20 but eventually failed the Flying Chute. In SASUKE 21, he failed the Jumping Spider yet again, and in SASUKE 22, he finally made it all the way to the Rope Ladder before timing out but was cut from the broadcast.
SASUKE Rebirth
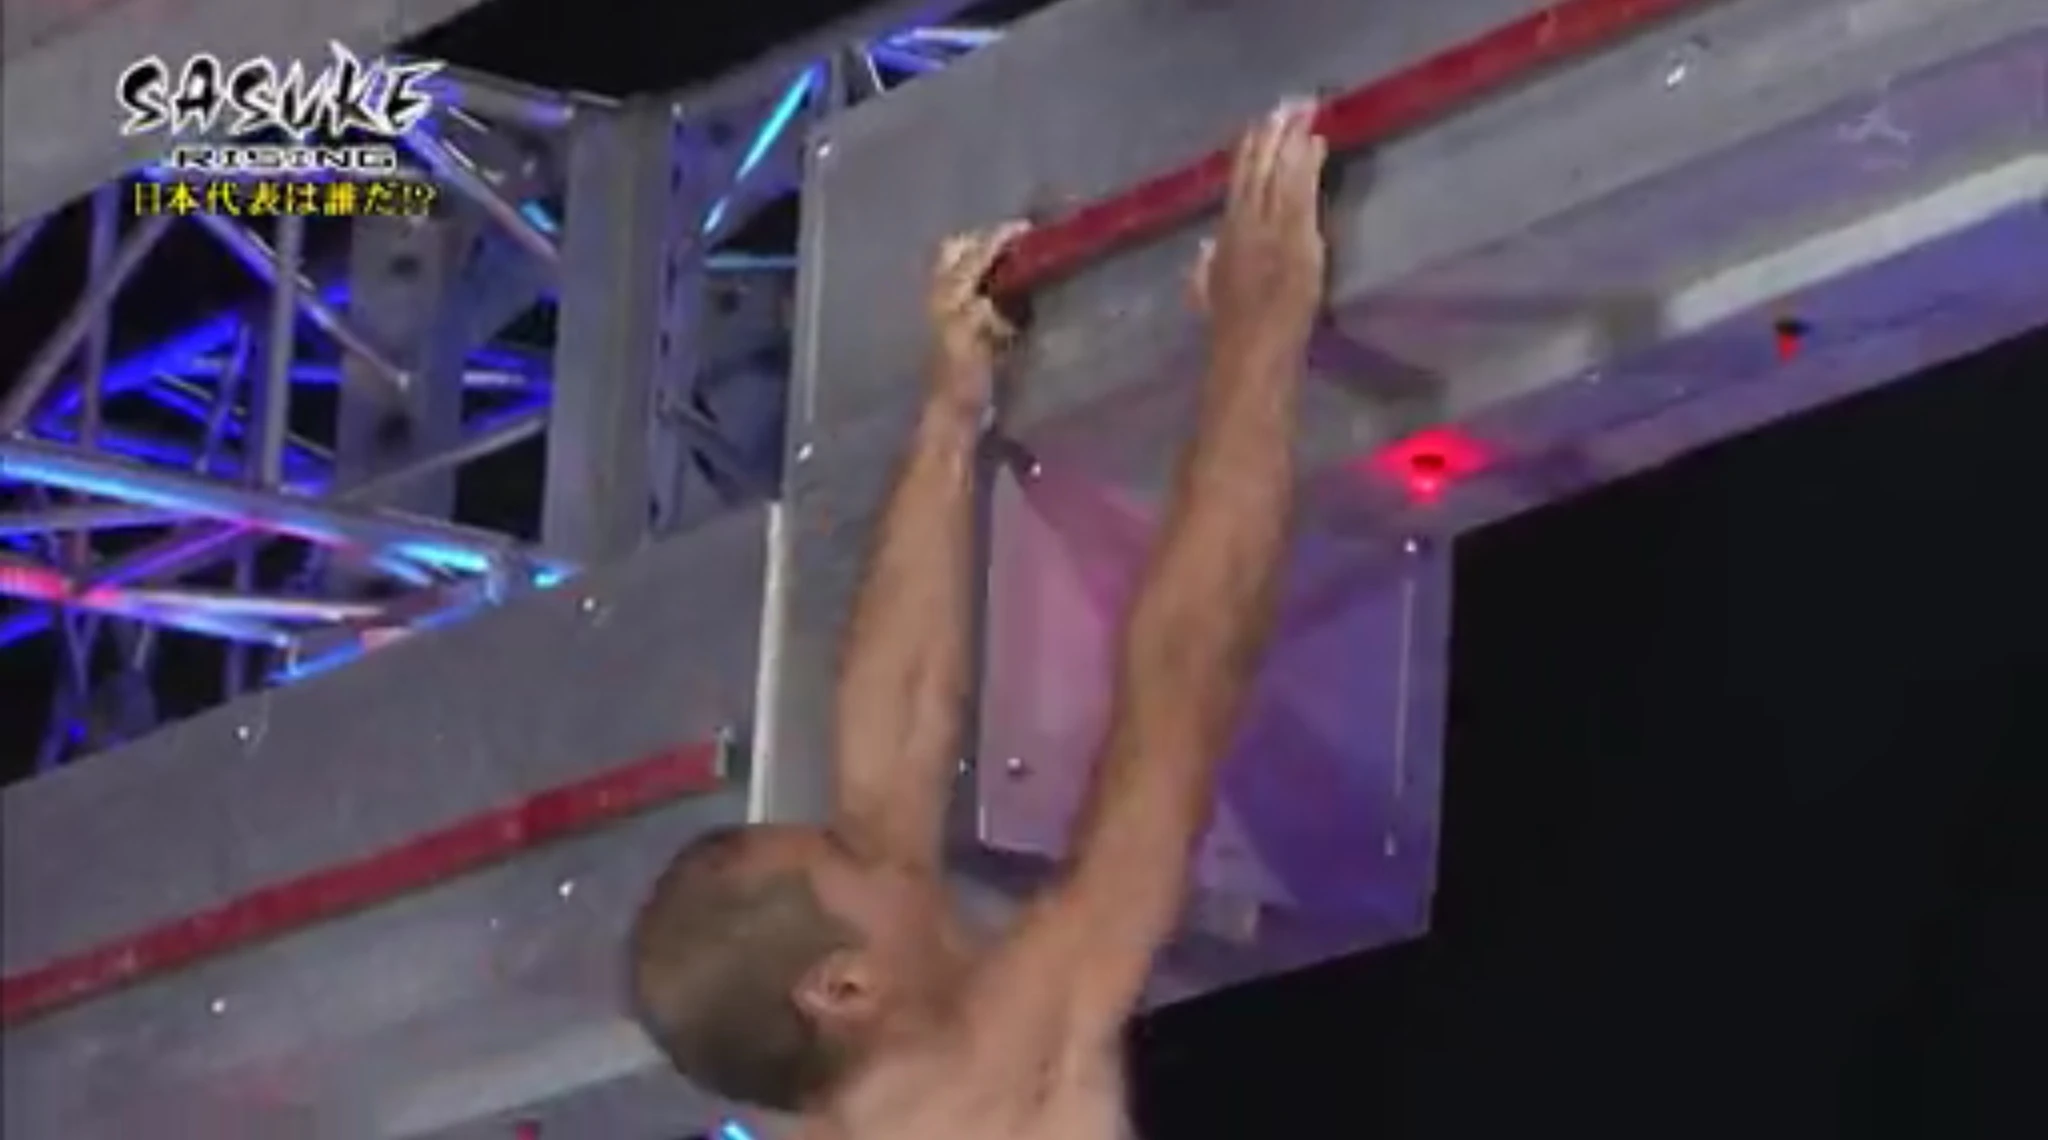
In SASUKE 23, he went at a much faster pace and completed the First Stage with time to spare. In the Second Stage, he was the first to defeat the new Unstable Bridge and as a result he was the first to clear Stage Two. In the Third Stage, he reached the Shin-Cliffhanger, but attacked it with a different strategy. He used his long
Takahashi Kenji reaching over the gap of the Shin-Cliffhanger (SASUKE 23). He is the only person to ever successfully do so.
armspan to grab the third ledge rather than jump to it. He is the only competitor to complete the Shin-Cliffhanger without jumping. This unorthodox strategy, which some refer to as the Kong Cross, allowed him to easily complete the obstacle. This was also the first time he ever cleared any version of the Cliffhanger After clearing three obstacles that were new to him, he fell just short of the finish mat on the final obstacle, the Gliding Ring.
In SASUKE 24, Takahashi again performed exceptionally. He cleared the First Stage with 24.06 seconds remaining, and on the Second Stage he swiftly defeated the new Salmon Ladder and Unstable Bridge combination, and easily defeating the stage with 32.11 seconds remaining, the fastest time in that tournament by far,also the 2nd fastest in sasuke history before levi's 38.54 seconds in sasuke 20.In the Third Stage, he focused his energy and beat the Gliding Ring that he failed in the previous tournament and beat Stage Three for the first time ever. In the Final Stage, he scaled the Heavenly Ladder rather quickly, but on the G-Rope his safety rigging tangled up and he timed out about halfway up the rope.
In SASUKE 25, Takahashi received a low start position in the lottery, #40. During the tournament, he beat the First Stage and Second Stage again. In the Third Stage, he was the first to attempt and beat the new Roulette Cylinder, Doorknob Grasper and Floating Boards. He eventually failed the Ultimate Cliffhanger while attempting the transition from the first ledge to the second ledge.
In SASUKE 26, he shocked many when he slipped off the Rolling Escargot that had claimed many strong competitors including one All-Star and one Shin Sedai. His run was digested along with Kanno Hitoshi's failure of the same obstacle (although G4 aired both of their runs in full).
In SASUKE 27, he again was digested in the First Stage due to the numerous clears, this time failing the new Spin Bridge obstacle. He also received his lowest known start position in any competition, #15.
Although present in SASUKE 28, he did not compete for unknown reasons. In SASUKE 29 he managed to clear the First Stage for the first time since the 25th tournament, doing so with 23 seconds remaining. He then became only the second man to clear the Second Stage, doing so with 5.14 seconds remaining, the fastest time of the night. On the Third Stage, he started off well, showing unbelivable speed and power on the Iron Paddler by speeding through the obstacle in just 3 seconds. However, he failed the transition to the 2nd ledge in Crazy Cliffhanger due to overreaching, as his left hand was far from the end of the first ledge.


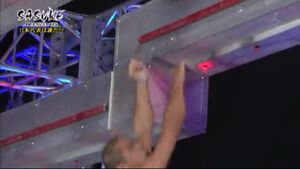
Kenji failing the Crazy Cliffhanger in SASUKE 29
SASUKE 30, he cleared the First Stage with ease, but on the Second Stage, he was disqualified on the Swap Salmon Ladder in a rather controversial matter. Although he landed the bar properly on the second jump, the left landing ledge pulls back causing the left side of the bar to drop down to the landing ledge and then pops back in after the left bar drops. Takahashi was greatly angered with this circumstance and even complained about it. Unfortunately it fell on deaf ears and his 100% Second Stage clear record was ruined.
In SASUKE 31, Takahashi made it back to the Third Stage, but failed at the Crazy Cliffhanger for a 2nd time. This time he made it to the jump, but couldn't hang on to the 4th ledge.
Takahashi then competed in American Ninja Warrior: USA vs the World (2016), as part of the reformed Team Japan which was modified to include taller competitors (such as himself and Kawaguchi Tomohiro) to adapt to the height-biased American course. Takahashi competed in Stage 1, up against Tim Champion and Kevin Bull. He went second, after Champion had failed the final obstacle, the Triple Swing, however he failed earlier on the second obstacle, the Propeller Untei and so Team Japan lost that round. He then went up against Drew Drechsel and Sean McColl in Stage 2. Drechsel had gone first and set a time of 1:23 seconds. Takahashi clearly rushed the Double Salmon Ladder as he attempted to clear 2 rungs at a time. He landed lob-sided in doing this and eventually the bar fell off the ladder, plummeting Takahashi into the water, costing Japan a win.
In SASUKE 32 he failed the TIE Fighter, a new obstacle. The last few runs were postponed after Drew Drechsel's run, who went directly after Takahashi. Drechsel had complained that the course was too wet towards the end of the day when he ran, implying that Takahashi's run, and resultantly the obstacle that he fell on was wet and slippery.
In SASUKE 33, he failed on the TIE Fighter again. His run was digested.
In SASUKE 34, Takahashi got his revenge on the TIE Fighter and managed to clear the First Stage. In the Second Stage, his run ended on the Reverse Conveyor, where he struggled and eventually fell off the belt due to fatigue, marking the first time that he legitimately failed the Second Stage.
In SASUKE 35, he made it to the Dragon Glider, however, the bar became dislodged, and his feet touched the water. In a fluff piece and post run interview, Takahashi said that Sasuke 35 would be his last run.
Trivia
- Takahashi has attempted the most versions of the Cliffhanger with 5.
- Takahashi, Urushihara Yuuji and Kanno Hitoshi are the only competitors to have cleared all four versions of the Salmon Ladder.
- Takahashi is the first competitor to fail the Reverse Conveyor by not timing out.
Results
| SASUKE | # | Result | Notes |
|---|---|---|---|
| 5 | 76 | Failed Rolling Maruta (First Stage) | All Cut. External Information. |
| 6 | 67 | Failed Soritatsu Kabe (First Stage) | All Cut. Time Out. External Information. |
| 7 | 46 | Failed Cliffhanger (Third Stage) | Touched down the mat with one foot, but lost his balance and fell back into the water. 2nd and 3rd stage run digested on g4. |
| 16 | 66 | Failed Cliffhanger (Third Stage) | Failed Transition. |
| 18 | 98 | Failed Shin-Cliffhanger (Third Stage) | Last Man Standing. |
| 19 | 84 | Failed Jumping Spider (First Stage) | |
| 20 | 1988 | Failed Flying Chute (First Stage) | |
| 21 | 85 | Failed Jumping Spider (First Stage) | Digest. |
| 22 | 80 | Failed Rope Ladder (First Stage) | All Cut. Time Out. |
| 23 | 84 | Failed Gliding Ring (Third Stage) | Failed Jump. |
| 24 | 94 | Failed G-Rope (Final Stage) | 20m up. Twisted up the G-Rope and got the safety wire tangled, causing him to stop. |
| 25 | 40 | Failed Ultimate Cliffhanger (Third Stage) | First Ledge. |
| 26 | 96 | Failed Rolling Escargot (First Stage) | Digest. Full run shown on G4. |
| 27 | 15 | Failed Spin Bridge (First Stage) | Digest. Full run shown on G4. |
| 29 | 87 | Failed Crazy Cliffhanger (Third Stage) | Failed Transition to 2nd Ledge. |
| 30 | 2995 | Failed Swap Salmon Ladder (Second Stage) | Disqualified. Technical error. First time failing the 2nd Stage. |
| 31 | 89 | Failed Crazy Cliffhanger (Third Stage) | Failed Jump to 4th Ledge. |
| 32 | 92 | Failed TIE Fighter (First Stage) | |
| 33 | 87 | Failed TIE Fighter (First Stage) | Digest. |
| 34 | 83 | Failed Reverse Conveyor (Second Stage) | Digest. Fell off the belt. |
| 35 | 93 | Failed Dragon Glider (First Stage) | Course Out. Dislodged bar and his feet touched the water. |