No edit summary Tag: rte-source |
No edit summary Tag: Visual edit |
||
| (30 intermediate revisions by 7 users not shown) | |||
| Line 5: | Line 5: | ||
|s_stage = [[Second Stage]] |
|s_stage = [[Second Stage]] |
||
|s_first = [[SASUKE 30]] |
|s_first = [[SASUKE 30]] |
||
| − | |s_last = [[SASUKE |
+ | |s_last = [[SASUKE 38]] |
| − | |s_comps = [[List of SASUKE competitions| |
+ | |s_comps = [[List of SASUKE competitions|9 competitions]] |
|s_attempt = [[SASUKE 30]], [[Hioki Masashi]] |
|s_attempt = [[SASUKE 30]], [[Hioki Masashi]] |
||
|s_clear = [[SASUKE 30]], [[Hioki Masashi]] |
|s_clear = [[SASUKE 30]], [[Hioki Masashi]] |
||
|}} |
|}} |
||
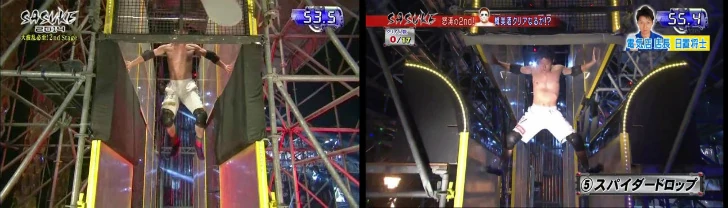
| ⚫ | The '''Spider Drop''' (スパイダードロップ) is a [[Second Stage]] obstacle that first appeared in [[SASUKE 30]] as part of the [[Spider Walk]]. The function of the obstacle was to drop from the end of the [[Spider Walk]] down to a lower set of panels and dismount the obstacle. The distance between the two panels is 1.8 meters. In [[SASUKE 30]], the obstacle had black mats separating the two sets of panels to prevent injury and a screen wall to prevent competitors from skipping the obstacle. |
||
| ⚫ | |||
| ⚫ | The '''Spider Drop''' (スパイダードロップ) is a [[Second Stage]] obstacle that first appeared in [[SASUKE 30]] as part of the [[Spider Walk]]. The function of the obstacle was to drop from the end of the [[Spider Walk]] down to a lower set of panels and dismount the obstacle. In [[SASUKE 30]] the obstacle had black mats separating the two sets of panels to prevent injury and a screen wall to prevent competitors from skipping the obstacle. |
||
| + | To date, [[Yamamoto Keitaro]] and [[Nagasaki Shunsuke]] failed at this obstacle in [[SASUKE 35]], and most recently, [[Saikawa Kōji]] in [[SASUKE 38]]. [[Drew Drechsel]] came close to fail in [[SASUKE 30]], as he slipped on the left side of the panel. However, he was able to correct himself and clear the obstacle. |
||
| ⚫ | |||
| ⚫ | |||
| + | {{clear}} |
||
| − | |||
| ⚫ | |||
| − | |||
| ⚫ | |||
| − | |||
| ⚫ | |||
| − | |||
| − | |||
| − | |||
| − | |||
| ⚫ | |||
| − | |||
| − | To date, no-one has failed the obstacle, although [[Drew Drechsel|Drew]] [[Drew Drechsel|Drechsel]] came close in SASUKE 30, slipping on his left side and almost falling before correcting himself and clearing the obstacle. He went on to pass the Second Stage that day. |
||
| − | |||
| ⚫ | |||
| ⚫ | |||
| ⚫ | |||
!width="20%" style="background-color: #4D0503;"|''SASUKE'' |
!width="20%" style="background-color: #4D0503;"|''SASUKE'' |
||
!width="20%" style="background-color: #4D0503;"|Clears |
!width="20%" style="background-color: #4D0503;"|Clears |
||
| Line 35: | Line 27: | ||
!width="30%" style="background-color: #4D0503;"|Percentage |
!width="30%" style="background-color: #4D0503;"|Percentage |
||
|- |
|- |
||
| + | |[[SASUKE 31|31]] |
||
| − | |align="center" style="background-color: #721410;"|[[SASUKE 30|30]] |
||
| + | |10 |
||
| − | |align="center" style="background-color: #721410;"|17 |
||
| + | |10 |
||
| − | |align="center" style="background-color: #721410;"|17 |
||
| + | |100% |
||
| − | |align="center" style="background-color: #721410;"|100% |
||
|- |
|- |
||
| + | |[[SASUKE 32|32]] |
||
| − | |align="center" style="background-color: #530B09;"|[[SASUKE 31|31]] |
||
| + | |8 |
||
| − | |align="center" style="background-color: #530B09;"|10 |
||
| + | |8 |
||
| − | |align="center" style="background-color: #530B09;"|10 |
||
| + | |100% |
||
| − | |align="center" style="background-color: #530B09;"|100% |
||
| + | |- |
||
| + | |[[SASUKE 33|33]] |
||
| + | |7 |
||
| + | |7 |
||
| + | |100% |
||
| + | |- |
||
| + | |[[SASUKE 34|34]] |
||
| + | |16 |
||
| + | |16 |
||
| + | |100% |
||
|- |
|- |
||
| + | |[[SASUKE 35|35]] |
||
| − | |[http://sasukepedia.wikia.com/wiki/SASUKE_32 32] |
||
| + | |6 |
||
| + | |8 |
||
| + | |75% |
||
| + | |- |
||
| + | |[[SASUKE 36|36]] |
||
| + | |14 |
||
| + | |14 |
||
| + | |100% |
||
| + | |- |
||
| + | |[[SASUKE 37|37]] |
||
|8 |
|8 |
||
|8 |
|8 |
||
|100% |
|100% |
||
|- |
|- |
||
| + | |[[SASUKE 38|38]] |
||
| − | |align="center" style="background-color: #530B09;"|[[SASUKE 33|33]] |
||
| + | |9 |
||
| − | |align="center" style="background-color: #530B09;"|7 |
||
| + | |10 |
||
| − | |align="center" style="background-color: #530B09;"|7 |
||
| + | |90% |
||
| − | |align="center" style="background-color: #530B09;"|100% |
||
|- |
|- |
||
| + | |Total |
||
| − | | align="center" style="background-color: #4D0503;" |Total |
||
| + | |78 |
||
| − | | align="center" style="background-color: #4D0503;" |42 |
||
| + | |81 |
||
| − | | align="center" style="background-color: #4D0503;" |42 |
||
| + | |96.29% |
||
| − | | align="center" style="background-color: #4D0503;" |100% |
||
|} |
|} |
||
| + | |||
| + | {{Sasuke Obstacles}} |
||
[[Category:SASUKE obstacles]] |
[[Category:SASUKE obstacles]] |
||
| + | [[ja:スパイダーウォーク]] |
||
Revision as of 14:42, 5 June 2021
The Spider Drop (スパイダードロップ) is a Second Stage obstacle that first appeared in SASUKE 30 as part of the Spider Walk. The function of the obstacle was to drop from the end of the Spider Walk down to a lower set of panels and dismount the obstacle. The distance between the two panels is 1.8 meters. In SASUKE 30, the obstacle had black mats separating the two sets of panels to prevent injury and a screen wall to prevent competitors from skipping the obstacle.
In SASUKE 31, the obstacle was modified to have a curved wall instead of the black mats and was made into its own individual obstacle instead of being part of the Spider Walk.
To date, Yamamoto Keitaro and Nagasaki Shunsuke failed at this obstacle in SASUKE 35, and most recently, Saikawa Kōji in SASUKE 38. Drew Drechsel came close to fail in SASUKE 30, as he slipped on the left side of the panel. However, he was able to correct himself and clear the obstacle.
Comparison of Hioki Masashi attempted both versions of the Spider Drop
Competitors' Success Rate
- All results based on the TBS broadcast and external information found.
| SASUKE | Clears | Attempts | Percentage |
|---|---|---|---|
| 31 | 10 | 10 | 100% |
| 32 | 8 | 8 | 100% |
| 33 | 7 | 7 | 100% |
| 34 | 16 | 16 | 100% |
| 35 | 6 | 8 | 75% |
| 36 | 14 | 14 | 100% |
| 37 | 8 | 8 | 100% |
| 38 | 9 | 10 | 90% |
| Total | 78 | 81 | 96.29% |