No edit summary Tags: Visual edit apiedit |
No edit summary |
||
| (44 intermediate revisions by 11 users not shown) | |||
| Line 1: | Line 1: | ||
{{Infobox Obstacle |
{{Infobox Obstacle |
||
| + | |300px |
||
|name = Gyakusō Conveyor |
|name = Gyakusō Conveyor |
||
| − | |image = GyakusouConveyor_S2.jpg |
+ | |image = GyakusouConveyor_S2.jpg |
| − | |caption = [[Hasegawa Ken]] |
+ | |caption = [[Hasegawa Ken]] crossed the Gyakusō Conveyor, [[SASUKE 2]] |
| − | |g4_name = |
+ | |g4_name = Conveyer Belt |
|s_stage = [[Second Stage]] |
|s_stage = [[Second Stage]] |
||
|s_first = [[SASUKE 1]] |
|s_first = [[SASUKE 1]] |
||
| − | |s_last = [[SASUKE |
+ | |s_last = [[SASUKE 36]] |
| − | |s_comps = [[List of SASUKE competitions| |
+ | |s_comps = [[List of SASUKE competitions|18 competitions]] |
|s_attempt = [[SASUKE 1]], [[Yamamoto Yoshihito]] |
|s_attempt = [[SASUKE 1]], [[Yamamoto Yoshihito]] |
||
| − | |s_clear = [[SASUKE 1]], [[Yamamoto Yoshihito]] |
+ | |s_clear = [[SASUKE 1]], [[Yamamoto Yoshihito]] |
| + | }} |
||
| + | The '''Gyakusō Conveyor''' (逆走コンベア), called the ''Conveyer Belt'' in English broadcast, is a Second Stage obstacle from the first thirteen SASUKE tournaments. Variants of this obstacle were also used in several [[Kinniku Banzuke]] events. |
||
| + | It is exactly what its name implies: a conveyor belt with an overhang covering it. Competitors must crawl across the conveyor belt from one side to the other. The conveyor belt is 8m long and moves 20km/h in the opposite direction of the competitors. |
||
| − | The '''Gyakusō Conveyor''' (逆走コンベア), called the ''Reverse Conveyor Belt'' in English broadcasts, is a Second Stage obstacle from the first thirteen ''SASUKE'' tournaments. It is exactly what its name implies: a conveyor belt with an overhang covering it that a competitor must complete by crawling across. The conveyor belt moves in the opposite direction of the competitor. Used exclusively as a time waster, it has only retired four contestants ([[Atarashii Ichirō]] & [[Ueki Shigenori]]) and was replaced with the [[Metal Spin]] in [[SASUKE 14]], which acquired a reputation as a feared obstacle. It eventually revived in [[SASUKE 32]], from a 12 year, 19 tournament hiatus since SASUKE 13, after the [[Backstream]] and between the [[Wall Lifting]]. The name in [[SASUKE 32]] was changed to '''Reverse Conveyor '''(リバースコンベア) from the English broadcast. A padding was added behind the conveyor belt if competitors fail at it due to fatigue. However, the speed of the conveyor belt had been decelerated compared to previous tournaments, perhaps due to the risk of going onto an electric obstacle after being inundated with the water from the Backstream. In [[SASUKE 33]], the speed of the conveyor belt increased to its original speed, thus causing [[Hioki Masashi]] and Mori Wataru to time out there and causing trouble for other competitors due to the wet hands and feet from taking on the Backstream. Variants of this obstacle were also used in several [[Kinniku Banzuke]] events. |
||
| + | Used exclusively as a time waster, it has only eliminated two competitors ([[Atarashii Ichirō]] in [[SASUKE 4]] and [[Ueki Shigenori]] in [[SASUKE 13]]) and was replaced with the [[Metal Spin]] in [[SASUKE 14]], which acquired a reputation as a feared obstacle. |
||
| ⚫ | |||
| + | It was eventually revived in [[SASUKE 32]] from 12 years and 19 tournaments hiatus since [[SASUKE 13]], as the seventh obstacle of the Second Stage, placed after the [[Backstream]] and before the [[Wall Lifting]]. The name in [[SASUKE 32]] was changed to '''Reverse Conveyor '''(リバースコンベア). |
||
| ⚫ | |||
| + | |||
| + | A padding was added behind the conveyor belt when competitors fail at it due to fatigue, which became another way to fail this obstacle. The padding was replaced by water in [[SASUKE 35]]. On a side note, the layout was already in use since its first appearance in [[SASUKE 1]]. |
||
| + | |||
| + | However, the speed of the conveyor belt had been decelerated compared to previous tournaments, likely due to the risk of going onto an electric obstacle after being inundated with the water from the [[Backstream]]. |
||
| + | |||
| + | Similar to its appearance in the early tournaments, this obstacle appeared as a time waster in [[SASUKE 32]], as all eight competitors who attempted this obstacle, could complete it. |
||
| + | |||
| + | Because of that, the speed of the conveyor belt was increased to its original speed in the [[SASUKE 33|next tournament]]. As the result, the obstacle was proven to be brutal, causing [[Hioki Masashi]] and [[Mori Wataru]] to time out there and causing trouble for other competitors (due to the wet hands and feet from taking on the [[Backstream]]). |
||
| + | |||
| + | This obstacle was proven to be brutal once again in [[SASUKE 34]], as [[Darvish Kenji]] and [[Urushihara Yuuji]] timed out at this obstacle. On the other hand, [[Takahashi Kenji]] became the first competitor to fail the obstacle without timing out, in which he ran out of stamina and was dragged by the conveyor to the padding. |
||
| + | |||
| + | [[File:JG_Reverse_Conveyor.png|thumb|left|276px|[[Jessie Graff]] attempted the Reverse Conveyor, [[SASUKE 34]]]] |
||
| + | |||
| + | There is also two sets of padding beside the belt possibly to prevent injury from being dragged by the belt. While it may be touched, it is not allowed for competitors to use for support (as [[Mori Wataru]] did in [[SASUKE 36]], which resulted in his disqualification), meaning the competitor must stay on the belt while moving forward. |
||
| + | |||
| + | {{clear}} |
||
| + | ==KUNOICHI Appearances== |
||
| ⚫ | |||
| ⚫ | |||
| + | |||
| + | In [[KUNOICHI 9]], since the BLUE Stage had no time limit to complete the stage, the obstacle was fallible if the competitors were dragged to the padding below the conveyor belt. However, from [[KUNOICHI 10]] onward, with the implementation of time limit to the stage, similar to its appearances in SASUKE, the obstacle was served as a time waster for the competitors. |
||
| + | |||
| + | {{clear}} |
||
==SASUKE 8 Version== |
==SASUKE 8 Version== |
||
| − | In [[SASUKE 8]] the whole course was showered with a typhoon that unleashed a heavy rain. This caused several obstacles to have trouble functioning. The |
+ | In [[SASUKE 8]], the whole course was showered with a typhoon that unleashed a heavy rain. This caused several obstacles to have trouble functioning. The Gyakusō Conveyor was among them. |
| + | |||
| + | To prevent the dangers of getting electrocuted, the belt was turned off, so it didn't move at all, however the rain that had fallen on the belt while it was not moving had left the belt slippery. |
||
| + | |||
| + | This caused some competitors to slip and struggle before finally making it to the [[Wall Lifting]]. |
||
{{clear}} |
{{clear}} |
||
| Line 24: | Line 54: | ||
==Competitors' Success Rate== |
==Competitors' Success Rate== |
||
*All results based on the TBS broadcast and external information found |
*All results based on the TBS broadcast and external information found |
||
| ⚫ | |||
| − | |||
| − | {| class="wikitable" width="100%" |
+ | {| class="wikitable sortable zebra" width="100%" |
| ⚫ | |||
| ⚫ | |||
| ⚫ | |||
| − | |Clears |
||
| ⚫ | |||
| − | |Attempts |
||
| ⚫ | |||
| − | |Percentage |
||
|- |
|- |
||
|[[SASUKE 1|1]] |
|[[SASUKE 1|1]] |
||
| Line 37: | Line 67: | ||
|- |
|- |
||
|[[SASUKE 2|2]] |
|[[SASUKE 2|2]] |
||
| − | | |
+ | |13 |
| − | | |
+ | |13 |
|100% |
|100% |
||
|- |
|- |
||
| Line 46: | Line 76: | ||
|100% |
|100% |
||
|- |
|- |
||
| − | + | |[[SASUKE 4|4]] |
|
| + | |11 |
||
| ⚫ | |||
| + | |12 |
||
| ⚫ | |||
| + | |91.67% |
||
| ⚫ | |||
|- |
|- |
||
| − | + | |[[SASUKE 5|5]] |
|
| + | |1 |
||
| ⚫ | |||
| + | |1 |
||
| ⚫ | |||
| + | |100% |
||
| ⚫ | |||
|- |
|- |
||
| − | + | |[[SASUKE 6|6]] |
|
| + | |5 |
||
| ⚫ | |||
| + | |5 |
||
| ⚫ | |||
| + | |100% |
||
| − | | align="center" style="background-color: #721410;" |100% |
||
|- |
|- |
||
| − | + | |[[SASUKE 7|7]] |
|
| + | |5 |
||
| − | | align="center" style="background-color: #721410;" |5 |
||
| + | |5 |
||
| − | | align="center" style="background-color: #721410;" |5 |
||
| + | |100% |
||
| − | | align="center" style="background-color: #721410;" |100% |
||
|- |
|- |
||
| − | + | |[[SASUKE 8|8]] |
|
| + | |5 |
||
| − | | align="center" style="background-color: #721410;" |5 |
||
| + | |5 |
||
| − | | align="center" style="background-color: #721410;" |5 |
||
| + | |100% |
||
| − | | align="center" style="background-color: #721410;" |100% |
||
|- |
|- |
||
| − | + | |[[SASUKE 9|9]] |
|
| + | |6 |
||
| − | | align="center" style="background-color: #721410;" |6 |
||
| + | |6 |
||
| − | | align="center" style="background-color: #721410;" |6 |
||
| + | |100% |
||
| − | | align="center" style="background-color: #721410;" |100% |
||
|- |
|- |
||
| − | + | |[[SASUKE 10|10]] |
|
| + | |4 |
||
| − | | align="center" style="background-color: #721410;" |4 |
||
| + | |4 |
||
| − | | align="center" style="background-color: #721410;" |4 |
||
| + | |100% |
||
| − | | align="center" style="background-color: #721410;" |100% |
||
|- |
|- |
||
| − | + | |[[SASUKE 11|11]] |
|
| + | |9 |
||
| − | | align="center" style="background-color: #721410;" |9 |
||
| + | |9 |
||
| − | | align="center" style="background-color: #721410;" |9 |
||
| + | |100% |
||
| − | | align="center" style="background-color: #721410;" |100% |
||
|- |
|- |
||
| − | + | |[[SASUKE 12|12]] |
|
| + | |10 |
||
| − | | align="center" style="background-color: #721410;" |10 |
||
| + | |10 |
||
| − | | align="center" style="background-color: #721410;" |10 |
||
| + | |100% |
||
| − | | align="center" style="background-color: #721410;" |100% |
||
|- |
|- |
||
| − | + | |[[SASUKE 13|13]] |
|
| + | |8 |
||
| − | | align="center" style="background-color: #721410;" |8 |
||
| + | |9 |
||
| − | | align="center" style="background-color: #721410;" |9 |
||
| + | |88.89% |
||
| − | | align="center" style="background-color: #721410;" |88.89% |
||
|- |
|- |
||
|[[SASUKE 32|32]] |
|[[SASUKE 32|32]] |
||
| Line 104: | Line 134: | ||
|5 |
|5 |
||
|7 |
|7 |
||
| − | |71. |
+ | |71.43% |
|- |
|- |
||
| + | |[[SASUKE 34|34]] |
||
| − | | align="center" style="background-color: #721410;" |Total |
||
| + | |10 |
||
| − | | align="center" style="background-color: #721410;" |106 |
||
| + | |14 |
||
| − | | align="center" style="background-color: #721410;" |110 |
||
| + | |71.43% |
||
| − | | align="center" style="background-color: #721410;" |96.36% |
||
| + | |- |
||
| + | |[[SASUKE 35|35]] |
||
| + | |6 |
||
| + | |6 |
||
| + | |100% |
||
| + | |- |
||
| + | |[[SASUKE 36|36]] |
||
| + | |11 |
||
| + | |14 |
||
| + | |78.57% |
||
| + | |- |
||
| + | |Total |
||
| + | |122 |
||
| + | |130 |
||
| + | |93.80% |
||
|} |
|} |
||
| − | === |
+ | ===KUNOICHI=== |
| − | {| class="wikitable" width="100%" |
+ | {| class="wikitable sortable zebra" width="100%" |
| ⚫ | |||
| ⚫ | |||
| ⚫ | |||
| − | |Clears |
||
| ⚫ | |||
| − | |Attempts |
||
| ⚫ | |||
| − | |Percentage |
||
|- |
|- |
||
|[[KUNOICHI 9|9]] |
|[[KUNOICHI 9|9]] |
||
| Line 129: | Line 174: | ||
|80% |
|80% |
||
|- |
|- |
||
| ⚫ | |||
| − | | align="center" style="background-color: #721410;" |Total |
||
| + | |7 |
||
| − | | align="center" style="background-color: #721410;" |9 |
||
| + | |8 |
||
| − | | align="center" style="background-color: #721410;" |10 |
||
| + | |87.5% |
||
| − | | align="center" style="background-color: #721410;" |90% |
||
| + | |- |
||
| + | |Total |
||
| + | |16 |
||
| + | |18 |
||
| + | |88.89% |
||
|} |
|} |
||
| Line 154: | Line 204: | ||
[[Category:SASUKE obstacles]] |
[[Category:SASUKE obstacles]] |
||
[[Category:KUNOICHI obstacles]] |
[[Category:KUNOICHI obstacles]] |
||
| + | [[Category:Kanzenseiha Eliminators]] |
||
Revision as of 07:25, 10 November 2019
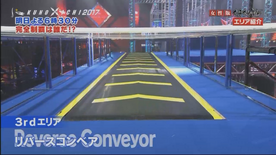
The Gyakusō Conveyor (逆走コンベア), called the Conveyer Belt in English broadcast, is a Second Stage obstacle from the first thirteen SASUKE tournaments. Variants of this obstacle were also used in several Kinniku Banzuke events.
It is exactly what its name implies: a conveyor belt with an overhang covering it. Competitors must crawl across the conveyor belt from one side to the other. The conveyor belt is 8m long and moves 20km/h in the opposite direction of the competitors.
Used exclusively as a time waster, it has only eliminated two competitors (Atarashii Ichirō in SASUKE 4 and Ueki Shigenori in SASUKE 13) and was replaced with the Metal Spin in SASUKE 14, which acquired a reputation as a feared obstacle.
It was eventually revived in SASUKE 32 from 12 years and 19 tournaments hiatus since SASUKE 13, as the seventh obstacle of the Second Stage, placed after the Backstream and before the Wall Lifting. The name in SASUKE 32 was changed to Reverse Conveyor (リバースコンベア).
A padding was added behind the conveyor belt when competitors fail at it due to fatigue, which became another way to fail this obstacle. The padding was replaced by water in SASUKE 35. On a side note, the layout was already in use since its first appearance in SASUKE 1.
However, the speed of the conveyor belt had been decelerated compared to previous tournaments, likely due to the risk of going onto an electric obstacle after being inundated with the water from the Backstream.
Similar to its appearance in the early tournaments, this obstacle appeared as a time waster in SASUKE 32, as all eight competitors who attempted this obstacle, could complete it.
Because of that, the speed of the conveyor belt was increased to its original speed in the next tournament. As the result, the obstacle was proven to be brutal, causing Hioki Masashi and Mori Wataru to time out there and causing trouble for other competitors (due to the wet hands and feet from taking on the Backstream).
This obstacle was proven to be brutal once again in SASUKE 34, as Darvish Kenji and Urushihara Yuuji timed out at this obstacle. On the other hand, Takahashi Kenji became the first competitor to fail the obstacle without timing out, in which he ran out of stamina and was dragged by the conveyor to the padding.


Jessie Graff attempted the Reverse Conveyor, SASUKE 34
There is also two sets of padding beside the belt possibly to prevent injury from being dragged by the belt. While it may be touched, it is not allowed for competitors to use for support (as Mori Wataru did in SASUKE 36, which resulted in his disqualification), meaning the competitor must stay on the belt while moving forward.
KUNOICHI Appearances

Reverse Conveyor, KUNOICHI 9
The Reverse Conveyor appeared as the fourth obstacle during the BLUE Stage (Second Stage) from KUNOICHI 9 to KUNOICHI 11, with the exception that the overhang was lower, forcing the competitors to lie down and crawl onto the conveyor.
In KUNOICHI 9, since the BLUE Stage had no time limit to complete the stage, the obstacle was fallible if the competitors were dragged to the padding below the conveyor belt. However, from KUNOICHI 10 onward, with the implementation of time limit to the stage, similar to its appearances in SASUKE, the obstacle was served as a time waster for the competitors.
SASUKE 8 Version
In SASUKE 8, the whole course was showered with a typhoon that unleashed a heavy rain. This caused several obstacles to have trouble functioning. The Gyakusō Conveyor was among them.
To prevent the dangers of getting electrocuted, the belt was turned off, so it didn't move at all, however the rain that had fallen on the belt while it was not moving had left the belt slippery.
This caused some competitors to slip and struggle before finally making it to the Wall Lifting.
Competitors' Success Rate
- All results based on the TBS broadcast and external information found
SASUKE
| SASUKE | Clears | Attempts | Percentage |
|---|---|---|---|
| 1 | 8 | 8 | 100% |
| 2 | 13 | 13 | 100% |
| 3 | 8 | 8 | 100% |
| 4 | 11 | 12 | 91.67% |
| 5 | 1 | 1 | 100% |
| 6 | 5 | 5 | 100% |
| 7 | 5 | 5 | 100% |
| 8 | 5 | 5 | 100% |
| 9 | 6 | 6 | 100% |
| 10 | 4 | 4 | 100% |
| 11 | 9 | 9 | 100% |
| 12 | 10 | 10 | 100% |
| 13 | 8 | 9 | 88.89% |
| 32 | 8 | 8 | 100% |
| 33 | 5 | 7 | 71.43% |
| 34 | 10 | 14 | 71.43% |
| 35 | 6 | 6 | 100% |
| 36 | 11 | 14 | 78.57% |
| Total | 122 | 130 | 93.80% |
KUNOICHI
| KUNOICHI | Clears | Attempts | Percentage |
|---|---|---|---|
| 9 | 5 | 5 | 100% |
| 10 | 4 | 5 | 80% |
| 11 | 7 | 8 | 87.5% |
| Total | 16 | 18 | 88.89% |
Gallery
")
")
")
")
")
")
")
")
")
")
")
")
")
")